Showing posts with label Follow the Build. Show all posts

Friday, March 6, 2009

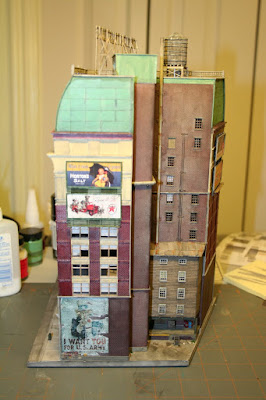
Dominion Update - IT IS DONE!!!


This will be quick because I still have a few things to get ready for the show tomorrow, which actually started tonight but I don't need to enter it till noon tomorrow.  For the last week I have been rushing to finish off all the last little tasks on the building, and I just realized I knocked off a sprinkle and so I need to fix it.  
I will post more into detail on the things that I did such as the Uncle Sam sign created by the sign master Frank and the smoke stack going up the back.  Also I will give a better farewell to the Dominion as well on Sunday night after I find out how I faired at the show.  Then we will finish of the Gordon and another incomplete building soon, then I will begin a few new ones.
Let me give an informal Thank You! to all of you who have been following this build, your comments, emails and support are priceless to me and mean so much, you keep me motivated. 
Most of all I want to thank Frank, Jeff (my brother), and my wife for the never ending support.

Thank You,
Christopher Brimley  


Saturday, February 21, 2009

Gordon Building Update - Davids Delicatessen


Building this little delicatessen took me considerably longer than I originally expected.  I also fought with it more than any other part of the this building, but it seems to have worked out.  

Like the entrance I built the door first and work out from it, I find this helps to keep things proportionate.  The door is a standard 36 x 72" and I built it from .020 x .020", .040"  and .080" strip.  Then I began to build up the deli from the bottom up.  I use primarily .010 x 040" and .020" square strip.  Sorry I am not to terribly descriptive on how it was built.

I painted the door with a mix I had made up a while ago and the painted the rest of the structure an olive drab.  I swear that everything in New York was painted olive drab in mid 20th century.  

The signs are mix of some that I through together and some that I have had for awhile.  The bit of tile in the entry was another texture that I printed from CG Textures.  I will be adding an awning once the rest of the structure is together, I also will add many more details on and in the windows at a later stage as well.  The front is essentially done now, so I will be moving on to the right side, other than that side the roof is the only other part that will be finished, the back and left will be forever unfinished, why waste time and materials on them.  

So what going to end up on the left?  Well it is going to be another structure on the scale of the Steven's, but I don't know for sure, what I do know is it will be a challenge to build and if I pull it off it should be rather neat.  But as always I could change my mind, stay tuned.

Chris


Thursday, February 19, 2009

Gordon Building Update - Entry


I finished the main entry to the Gordon today.  I built the doors first so the whole thing would grow out from that.  The doors are built from .020 x .040" and .100" strip styrene and they stand at seven scale feet tall.  The side windows are made from the same stock as the doors and then some .020" square strip for the mullions.
I then used the same trick for the blocks as I did for the top, used some scrap siding that I used up on the windows and then built the lintel over the door.  I used the same trick for painting as before and it matched perfect, I am glad I have this all typed here incase I need to do all of this again.  Next I made two little sconces from .010 x .020" and .040" strip and then used a silver prisma color marker to color it, I used the same thing on the door.  Then last I used some Woodland Scenics dry transfer lettering for the address.
Tomorrow I hope to have the other side at least started, I am planning a Delicatessen, but I may change that, I also want to do a small radio station but I may wait on that, we'll see.  


Wednesday, February 18, 2009

Gordon Building Update - Windows


I said I wasn't going to post on the Gordon tonight but my plans fell through and so I built windows.  I used a technique that I have been wanting to try ever sense I designed a warehouse a few years ago.  What I use is a etched brass mesh to kill all the mullions but it looked to flat so I  added some .020" square strip styrene on top of the mesh. 
 
I then sprayed on a primer after I masked the windows off so the brass would hold the paint.  I wanted a darker color in the windows so I used a flat dark grey, in the photos it looks textured but in-person it looks fine.

Some of you are probably scratching your head in confusion because of the way I am building this, I wanted to try finishing the front facade before adding the rest of the structure.  On other projects I felt I fought with it more as an assembled structure, and caused damage as I went along, so far I am really enjoying this method and will try it more in the future, but it may depend on the structure as well.  At the rate I have been going I hope the have the front done by the weekend so I can start the rest of the structure.


Tuesday, February 17, 2009

Gordon Building Update - Paint

Yes I went ahead and painted the front shell, I have been having fun with this, it really feels nice going to a smaller project, its like a vacation.  So because of this excitement I have been moving at a steady pace, and so the Sunday only update wont work on a smaller project.  
I gave it a base coat of Polly Scale ????, most of the label is gone.  I got it for free (not five finger free) from my local hobby shop, I wanted some empty mixing bottles and he was out so he gave me a bunch of old paint he had, but this one was still good.  Once dry I attacked with india ink/alcohol wash and that made it a little darker than I wanted.  So when all was dry I came after the wash with another wash of Polly Scale Dust, as I reworked over a few spots I noticed the paint was stripping the india ink wash and it looked AMAZING!  What happened was the brush removed the wash on the surfaces but not in the corners and cracks and I must say is one of the best paint jobs I have ever done, or as Bob Ross would say "A happy accident".  The pictures do a horrid job showing my paint job on the building, the blocks turned out better than I hoped for and now I really regret not adding them to the rest of the building.
Next up I will build the windows and there are ONLY TWELVE!, unlike the 160 that I had on the Dominion, and the way I am going to do them will be a breeze.  I doubt I will post tomorrow on the Gordon cause I have other things to do but I will update when I get the windows done.


Gordon Pilaster Plans

Here are by request the plans and dimensions of the pilasters on the front of the Gordon that I built yesterday.  Click on the image to view it better.  Also the plans are scaled 3:1 so you could view them better, but all of the dimensions are accurate.

If anyone has requests like this I am more then happy to help out and supply the info.

Monday, February 16, 2009

Gordon Building Update - Facade Takes Shape


Sorry for the surprise but I got a large amount of work done on the facade of the Gordon.  

I had to add a .010" layer to start on the frame work, across the top 1/2" I cut strips of .010 x .125" a 1/4" long and made individual blocks.  It turned out extremely well and I should have done it all the way down, ah well.  I then built the tiny cornice on top and the slightly larger one above the first floor from various dimensions of strip.  
The three vertical parts have a core of .040 x .250" strip, then I added three layers of .080, .100 and .125 strip that is .010" thick each.  Then I built the little decorative parts up at the top floor from .010 x .060" and .040" strip stock.  
In the first photo you can see my cement of choice, it is Tamiya Extra Thin Cement.  I used to use Ambroid Pro Weld, but the Tamiya has a tiny brush, so I don't flood my parts with too much cement and end up with finger prints.  Another bonus is the Tamiya is in a short squat bottle so it is less prone to being tipped over, but I have still managed to tip it.
This was just a quick update and I may not have explained some parts very well, please ask for clarification if needed.


Sunday, February 15, 2009

Gordon Building Update - The Beginnings


Hello again, as I said here is the first Gordon Building update.  Lets get to business.  First off I cut three .060 x .250 and .188 strips, I cut them about a 1/4" too long just in case.  Then I cut a few strips off of a sheet of .030" spacing metal siding from evergreen for the areas between the windows and I also cut a .020 x .060" strip for the sills.  Last I needed some .060 x .250 cut for the top and bottom.
I then glued the basic frame work up in my magnetic gluing jig, that way everything stayed good and square, this is the critical point cause if the beginning is out of square then from here on out nothing will go right.  I also cut a little spacer so the spacing for the windows would be perfect.
Once the frame work is dry I popped it out, flipped it over and added .040 x .060" strip to the back for added strength and support.  Then I cut the tops of the vertical parts flush with the top horizontal pieces.  This building might move quickly so I may post a little more often than the Dominion, but we shall see.


Dominion Building Update - Trying to Find a Good Interior Designer


Hi Folks!  Well here it is the last Sunday update on the Dominion Trust Building, and I must apologize about the bittersweet end.  I am very burned out on this project, but don't worry, I still need to finish it for the March 6th show at Ogden Union Station.  I have a few little jobs left to do, but I need to shelve it for a couple weeks so I can start on the Gordon and finally start on some other major stuff.  I wont say too much about the gordon yet cause after all this is the Dominion show.

I began work in side and I hate to admit it but I don't like doing interiors for some strange reason.  I think it is because it is usually one of the last tasks and when it is time to do it, I am mentally on my next project.  The basically all but the furniture is photo textures that are free to down load at cgtextures.  I then sized and pieced them together on Adobe Illustrator and then printed them out on a nice glossy brochure paper on a laser copier.

The few pieces of furniture I built from strip styrene, then painted appropriately.  The table at the entryway, I added some pamphlets and a vase with flowers.  The pamphlets are paper cut to size and the vase was cut from aluminum tube.  The flowers are made from tiny squares of red paper and the stems are, he he he, hair:)  The few shrubbery's  are 1/8" square tube and clump foliage.  The paintings I got from the same site as the other textures, I them added a .020" plastic back, then colored the edges with a brown Sharpie.  I still need to build more furniture but that will come later.

I also added a black card stock view blocks on the upper floors but the windows are too lifeless and so I have a few things that I will try out to see if they will look better.  I have most of the glazing in, I just have a few windows left.  I also have curtains to hang as well on a few windows and have a few more signs and other details as well.

So I will post finished pictures of the Dominion before the show and have a better farewell but other than that we move to the Gordon.  I have built the Gordon about a dozen times in my head, trying to figure out the best route to take it.  I still have gobs of time today so I may post on it late tonight.  That reminds me, do you guys like the Sunday updates or would you prefer I post more often with smaller updates as I go?  If I don't hear anything I will stick with the Sunday posts. 


Friday, February 6, 2009

Dominion Building Update - Rooftop Sign & Columns


You guys probably wont listen to me anymore, I tell you todays post will be arriving later than usual but here it is earlier than usual.  I was able to finish the few things I wanted done for todays post faster than expected and I have a busy day ahead of me so I decided to get it out of the way.

After the poll and a few persuading  emails and posts I decided to forge ahead and erect the rooftop sign.  I had been hesitant to build it because I thought it would be a long and difficult trek the build it and the results wouldn't justify it.  But I've got to say, it went together rather easy and painless.  The 3D mockup I had done stood at 24' tall, I cut a piece of styrene to see how this looked and it felt too short, so I upped it to 30' or about 2 1/4".  

I needed to build six uprights, four would be identical and the other two would need to be custom to fit it with the rooftop building.  I built the uprights from .030" square strip, I wanted to use .020" square strip but felt that it wouldn't be strong enough, but the .030" worked well. 
I was surprised how strong the uprights were after the glue had cured.  

The letters had been a dilemma from the beginning, how was I going to get the font I wanted and have the not look like I cut them out by hand.  I am not a fan of those 3/4" white sign letters and so those were out.  So I started to get a file ready to send and have them laser cut for me, but then I discovered something very cool.  My wife loves to scrapbook and I heavily encourage her to do it because I feel guilty about spending so much time and money on my hobby.  I had been a supporting husband and tagged along to a few scrapbook stores with her, I started looking at die cuts to possibly use to cut the  the letters, but everything was too big or "too cute".  I did a little research and for fairly decent price you can get machines to hook up to your computer and cut any font or clipart you want.  My wife had been wanting a die cutter but just a cheep one that you bought the shapes and manually rolled the paper through.  So to my luck Tuesday was her birthday and I went out and bought her the Quickutz Silhouette (with the intention of using it for my sign).  So the letters are cut from a heavy card stock cause that is about the thickest it could handle, some of the more expensive ones out there can handle .010" sheet styrene.  video at the end of the post of it in action

So after the machine cut out the letters I then glued on two .025" rods while the letters were still semi part of the scrap so all the letters would stay evenly spaced and level.  I then glued on the up rights put it on top for a dry fit and . . . . its way too tall!!!  After some consulting with people I trust I chopped 10' off or 3/4".  That fortunately worked and it felt much better.  I then added the lateral X-bracing in three of the sections and then painted and weathered in the usual fashion.

The other thing I finished was the columns at the main entry, this was another area that I kept putting off cause I couldn't decide on what I wanted.  But I settled on HO scale columns made from Scale Structures LTD. (pt. # 2137).  I had to shorten them very slightly to fit but they worked very well.  

I have a open week coming up, so I hope to have most of the left overs done for next week, if I finish what I want next week will be the last Dominion Update (sniff).  I have a few new structures that I scratch build and I have a few old projects that I need to finish.  So what ever I do next it will be smaller than the Dominion, but don't worry they will be fun.

Chris

initial upright size


this is a very bad video of the Silhouette in action

Monday, February 2, 2009

My Copper Patina Mix REVILED!


The most common question I have had since I began the Dominion Building over a year ago is "what did you use or how did you get the patina on your roof?"  I even had one person ask if I was using "reindeer piss", he was joking of course.  
I feel like everyone thinks I am using some kind of secret formula, but I guess I come forward and revile the smoke and mirrors I use to create the magic.   So here it goes . . .

I just mixed three colors of paint!

Kind of disappointing huh?  Now here comes the real disappointing part, I don't know what the exact mixture is!  My guess is 1/2 green, 1/4 blue and 1/4 white, the reason I don't know is I just kept adding blue or white to the green till it felt right.  The key is the blue and I would add it first, then lighten it up with the white.  

Now here comes the next trick to making it look real.  Once you have the paint down and you have given it ample time to cure, attack it with a very liberal coat of india ink/alcohol, but do it fast and then don't touch it because the alcohol will wash away the paint.  When it dries you can add further coats if needed but the first is good enough, I will usually touch up spots and add shadowing later.  Then after it is dry add highlights and some texture by dry brushing with white paint.  But remember you NEED to weather it for it to look right, just the paint mix alone wont work.  

But thats about it, sorry if I disappointed you.  If you still have further questions please ask me and I will try to answer it.  

These are the exact paint colors I used to make the patina and the resulting color (I think my mix could use a little more blue), any other brand should work just fine as well.

Sunday, February 1, 2009

Dominion Building Update - Sidewalks


This Sundays update is coming to you early for obvious reasons (Go Steelers!).  I also need to apologize that I did not get anywhere as much work done as I wanted to.  It has been a busy week and a very nasty cold has swept through my family, I am just now getting it.

So the few things that I did manage to complete are the billboard on the one end that I posted about a few days ago.  The other is a plate for the building to rest-upon, and make the building look a little more finished.  It will be nice to display it on the plate because it will be a few years until it has a permanent home.  

The plate was cast from plaster in a mold that I built from styrene.  I sprayed a little Pam onto a paper towel and gave the mold a good rubdown.  The Pam acts as a release agent because you cant flex plastic like a rubber mold.  Also don't spray the Pam directly on the mold, rubbing it in with a paper towel is sufficient and gives you an even coat.  If you are careful with the mold you can get a few pours out of it, which comes in handy when you don't mix enough plaster and by the time you get the next batch ready, the first has setup too far to work it (not like that has ever happened to me).  I popped the casting out after just a few hours so I could easily add the expansion joints in the sidewalks by using a dull #11 X-acto blade.

Once the casting was mostly dry, I began staining (not painting) the plaster with washes of my favorite India ink/Alcohol mix, if have been following me you know that I love this stuff.  I stained the sidewalks, curbing and gutters with a fairly light wash (test it first on the bottom or on an area that wont be visible).  Make sure that you scribe in a line separating the street and the gutter, it helps to prevent the darker street wash from bleeding into the lighter.  I was very liberal with my washes to ensure that it was getting into all of the seams.  The street is simply a darker wash, I added a little more ink into the existing mix (a little india ink goes a very long way, so use it sparingly).  

The storm drains were very easy to make but add allot detail.  On the mold I had glued a 3/8" long strip of styrene.  Later I painted some .010x.080" strip a dark grey, cut it to length and glued it in.  The lamp I bought from Miniatronics (72-032-01), and it is very close to the bishops crook style that was used throughout New York.  It was molded in black so I panted it a olive drab to match a few pictures.  I made up the street signs from paper and styrene, they were a little more time consuming to make than I thought but I think they look okay.  The fire call-box I built from styrene again, then painted.  I used figures & benches from Woodland Scenics for the bus stop but I made the sign, I have a few more figures that I will add later as the building gets closer to being done.  The mail box is from Period Miniatures, I think.  Then I added a few things of garbage.

I still need to add a few fire hydrants and couple minor details, I don't want too much so the attention stays on the building.  Unfortunately next week is looking grim for construction time, so we shall see what I can finish up.  Please ask if you have any questions on something that I may have missed or didn't explain very well.  Sometime this week I will post about how I created the patina on the roof, I have been getting many questions on this.

Sorry about the blurry pictures, I need to download that Helicon Focus program.


Friday, January 30, 2009

Billboard Frame #2


This is the billboards and frames for the other side of the Dominion.  I wont go into much detail on how I built this set because the construction is basically the same as before on the Lets Build a Billboard Frame post from a few weeks ago.  

What I did change from before is first I simplified the design a bit, second I used a different paint scheme and third I used .060" I-beams for the vertical beams.  I wanted this one to be different from the first set, originally I wanted to go more ornate but unfortunately once the building is place on a layout this side of the building will never be seen.  I will reuse the signs in another location eventually because the are too good to be hidden.  

I want to thank Frank Giacobbe for making these wonderful signs for me, he does a first class job.


Sunday, January 25, 2009

Dominion Building Update - Doors, Windows and Roof's oh' my


This little guy is getting so close to being done, but I am having mixed feelings.  On one hand I cant wait to move onto other projects, and then on the other hand I am sad cause I haven't slaved away on one specific thing for so long sense, well, forever.  

What I finished off first this week was the doors and entry on the bottom corner of the building.  It was quite simple but I think I pulled it of okay.  First I framed the two doors from .010x.040" strip, and cut a bar from .015" brass wire .  After the glue dried I gave it a once over with a Prismacolor Metallic Silver (PM-117) marker.  I built the box for the entry from some scrap .020" sheet styrene, then painted to match the outside.  On the prototype I noticed there was a cast iron gate that is on the side walls when opened, so I used a section of Gold Medal Models iron fence painted flat black.

My next task was to finish off the roof, but before I could do that I needed to add the glazing and shades on the top five floors due to the fact the roof would be fixed and I couldn't reach the windows from the bottom very well.  Not much to talk about in this step other than the glazing was cut from .010" acetate and the shades are a light grey card stock.

I was then able to begin work, I cut the sheet of .020" sheet to fit the alloted space and then glued it in.  I than began work on the railing across the cap of the roof.  The balusters are from Plastruct (BLAC-200) and the posts are cut from .080" square strip styrene, and the little ball on top is. . . a. . . its a sprinkle, you know for cupcakes, ice cream and toping off posts.  I then painted the railing to match the grey on the bottom three floors.  The railing on the prototype could only be done by etching metal and I don't yet have the power to do that.

I then built the little mechanical house on top from sheet and strip styrene.  I also did a poor job at making a skylight, I want a few of these so I hope I can make less embarrassing ones soon.  That is the water tower I built a few weeks ago and I will be putting it up, even though there isn't one on the prototype.  My justification for this is that the prototype is in Vancouver, BC and there are mountains there so water pressure is not an issue.  But as my building will be going into a fictional version of NYC, the water tower is justified.  I wont do too much more to the roof because 95% of the rooftops I looked at during this era are quite clean and clutter free, but a little garbage looks good.

I finished most of the glazing and shades on the right side and will finish the left tonight.  There is so very few big things left to do, it down to details now.  Well see what gets done for next Sundays update, I don't even know.  


Tuesday, January 20, 2009

Photo of the Day


I have been kicking around the idea of scrapping my current half built El and going with a more ornate station such as this one right above the very text you are reading (wow what are the chances of that) This station was I think on the 9th ave. El if memory serves me right.  But don't hold your breath cause this may not happen for awhile.  

I am very tired, hence the quirkiness. 

Sunday, January 18, 2009

Dominion Building Update - Part 2 - 011709


Okay here on post #2 I have two things to talk about that have made me very excited.  

#1 - ALL THE WINDOWS ARE DONE!!!!!!!!!

#2 - All faces are done.

Sorry but I couldn't help but over emphasize the fact that the windows are done and yes all faces (walls) are done.  So now my list of to-do's is beginning to get short, What's left?  

 - Glazing and shades for windows
 - Roof
 - Mezzanine
 - First floor interior
 - Details and Signage

For the show I will be also making a little base for it to rest on.  But that is the list in a nutshell.  
These are a few more photos of the finished windows on the top two floors and a few other overviews.

Until next sunday.