Tuesday, December 30, 2008

Swift Building Elevations


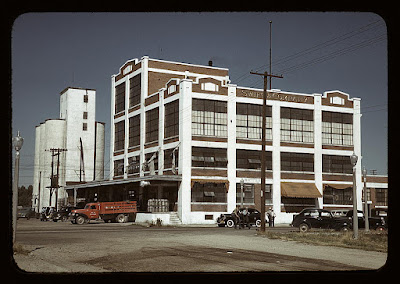
This is a elevation for a background building that I drew a few years ago.  I was going to have road run under the opening in the middle and install a mirror to give the illusion of depth.  This was or is going to be a Swift meatpacking plant, but is based of off a former Navel warehouse that is in Brooklyn, it may be gone now but I haven't checked. 
The plans don't have any dimensions but it should be to scale, if you want to plot it out it needs to be done on C size paper (24x36").  It may not look like it but this is a BIG building for Nscale.  When I do build it for my layout I may scale it down a hair.

These are a few photos of the prototype below for a little reference.


Monday, December 29, 2008

Will You Be My Neighbor

I realized a few days ago that when I finish the Dominion for the March show, I don't have another structure locked and loaded to go.  I do have a few little things to knock out for the Junction City modules, but most I can build in a weekend.  

There are a few larger structures that I want to build for the the city but, A: I don't know where or how they will be placed and B: My skill level is still lacking to attempt them.

So what do I do next?  I build a neighbor for the Dominion building!

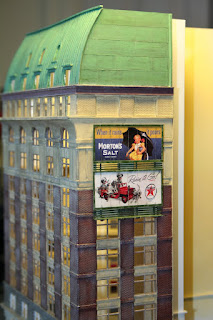
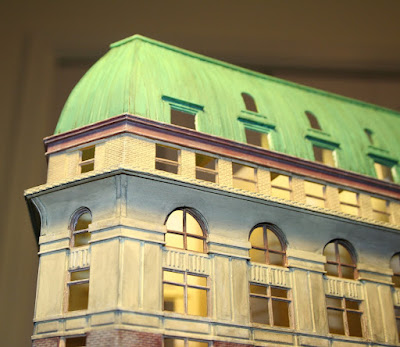
What needs to be built is a building of about 7-8 floors in height, it will be on the side of the billboards that are currently up and they will be separated by a small alleyway.

My first choice was to do a theater.  I had found a few photos of an amazing Art Nouveau specimen in Manhattan, but I then felt I needed something a little more subtle.  So I decided on a very basic Art Deco structure, that will largely be my own design.  I began to get excited and wanted to start the plans and something new that I will be doing. . . . color studies.  Then I realized I had a deadline of sorts and put it all on hold.

When I have my plans started I will be posting very quickly, but not till the Dominion is done.

Photo of the Day

I posted photos of this area about a month ago, this is the former town of Bingham, UT.  It was about a half hour away from where I currently reside.  After I finish my Eastern city layout (in something like 20 years) I plan to recreate this lost era.  We all say things like that but deep down you know that it may never happen.  The mine is still very active today, but this area has been strip mined to the bone.

Sunday, December 28, 2008

Photos of the Day; Sky-bridges


Let me introduce to you three very different sky-bridges today.  I find these a very fascinating aspect of architecture, they are usually built after the corresponding buildings and so the styles are different.  All three are located in New York.

Our first example is gorgeous, I may design a pair of buildings just so I can implement it into my layout.  This is located on the former NABISCO building.

The next one is also located on the former NABISCO building, but is only visible from the interior of the building, this is great reference for a more industrial structure.

This little one spanning an alleyway was part of a former hospital, a simple design, but would add much needed character to your structures.

Dominion Problems

In my post yesterday, if you look carefully at the brick you can see mortar lines, I didn't want mortar lines!  In all photos of the prototype, the brick is painted thus no mortar lines.  Why would I do such a thing you may ask?  It was a mistake and I think it may have been a chemical reaction.  What I think happened is last Monday I applied a coat of dullcote to seal in what has been done.  Yesterday I gave all the brick a wash of india ink/alcohol.  When that was dried the black of the india ink went white???  

So after that and not being a fan of the color I chose for the brick, I decided to repaint. . . . . . again!  The color is a little brighter of a red, it is hard to tell from my crappy photos  but it made a huge change.

The good thing that came from this is I think I stumbled across a really good way to do mortar lines in brick.

Saturday, December 27, 2008

No Longer Homeless

I attached the billboards to the side of the Dominion today.  I used Woodland Scenics, Scenic Accents Glue because it has some properties that I like.  Such as it can be removed if the reason arises.  On the other set of billboards, they only need to be placed for the show in March.  But they will never be seen once on the layout, and I don't like to waste material,time and money if at all possible.  I will use them elsewhere later on.

This side is about done with paint, and now my attention will turn to the bottom two floors.  I have some serious work ahead, like full interiors on the first floor and some added details on the outside, but all the long monotonous work is done.  The end of this building is starting to look like a reality and you have know idea how that feels.  I started this structure a little more than a year ago and have been working on it off and on depending on priorities.  I have two months to have it done and I think I will make it. 

Friday, December 26, 2008

Photo of the Day


The New York Central highline that ran up Manhattan had some scenes that were about as unique as any as you could find anywhere in the world.  When I eventually begin my beloved city of Hudson, this exact scenes is already planned to be implemented. 


Wednesday, December 24, 2008

Merry Christmas/Photo of the Day

I hope everyone has a merry and a safe Christmas this year.
Thank You,
Chris

Lets build a billboard frame.

On my Dominion building I have a few billboards that will be applied in a few areas.  There will be a total of four billboards, stacked in pairs, such as the photo above.  The construction was very simple and requires minimal tools and material.  I probably spent a whole $1 on this, the color copy cost half a buck and the rest maybe added up the rest.  If you don't have the material on hand, it will obviously cost a little more.  

To begin with I made a copy of the billboards.  Something I will highly recommend is to go to Fedex Kinko's, Office Depot or a place that makes color copies and pay them to print it.  If you have a color laser printer, that will work as well.  DON'T use a inkjet, the ink will run if it gets wet and can smear by just handling it to much.  Epson printers that use the Dura-Bright ink are the only exception to this.  Also laser printers and copy machines lay down much crisper text than an inkjet.

The billboards that I am using were created by the  moderator of the N Scale Modeling blog.  
He has the Morton Salt sign and many other very useful signs to download for free.

 After I had printed the signs I cut them out using an X-acto knife.  I then cut out a back from .020" sheet styrene, cut it about a scale foot higher and wider then the paper sign.  Use white glue to attach the sign to the back, making sure to be centered.  I then lightly scored the sign to give the illusion of separate sheets.  I had pre-painted some .020x.040" (for top and side) and .020x.060"(for bottom) strip for the frames, green is the most common for the style that I am going for.  Now cut the strips to fit, the sides need to be precise but the top and bottom can be long, then just file flush with the sides.  After touch up with same paint as used earlier,  and you have the frames.

Next we cut the vertical mounts from .020x.040" strip, an I-beam would work 
well in this situation.  I spaced the mounts about a 1/2" from each other.  After the glue setup I began attaching .020x.030" horizontal slats below each billboard.  

Once all slats had been applied, I cut four 1/4" pieces of .010x.060" strip for the brackets to attach the platform.  I then glued the the brackets to the vertical mounts.  After the glue setup, I then added two planks for the platform made from .040x.060" strip styrene.  

Once the glue has set up we need to finish painting.  I first painted the vertical mounts a dark grey, don't paint the back side cause that will cause issues when you attach it to your building.  I then paint everything else the same green that I used on the frames.  Once that has setup I then dry-brushed on a little white to age and highlight. Then I added a little india ink wash to a few spots for further weathering. 

I still need to build the second set of billboards and a little more prep work needs to be done to the building before I attach them. 
I will post photos of the billboards once that happens.  Until then keep watching.

Thanks,
Chris

Monday, December 22, 2008

Photo or Video of the day.

This short film was made in the early 1950's and features the now gone Third Ave. El in Manhattan. You see some amazing shots of the city on our journey back in time. I had read that this was nominated for an Oscar in the short film category, but I am unaware how it did, also beware the harpsichord music throughout the film, it has now grown on me and I sort of enjoy it, (but I like different music).

Chris

Sunday, December 21, 2008

Dominion Building Transformation

I went ahead and bit the bullet and repainted the model to match the prototype postcard.  First off, what has changed sense you last saw this?  All of the older windows I decided to rip out, so all of the frames on the eleventh floor are new.  I also framed in the windows around the right side (you cant see those in these pictures).  I discovered awhile ago that there is brick on eleven, but I hadn't bothered with it cause I had it painted.  But because it had been decided to repaint, I added the brick sheet in.  Then I have done a little prep work for the windows on twelve and Thirteen.

After that and a few other little things, it was time to paint.  Everything but floors four through eleven was masked off.   I then sprayed a Coat of Testors Modern Desert Sand and let it dry over night.  The next day I painted the brick between four & eight with Polly Scale Boxcar Red.  It turned out good but I still think it is a hair dark, however I will let it slide.  That then dried very quickly and so I began masking off around the windows.  I debated this for awhile, I couldn't decide what would be faster, hand paint every window and touch up after, or mask off each window and spray.  I chose the latter because I wanted a better coat and I felt masking would not take too long.  I was right about the paint but I spent about five hours applying masking tape (I watched A Christmas Story and The French Connection during this).  The arched windows were too difficult to mask, so those I painted by hand.

When I had all of this done, I must admit I was disappointed with the results.  So I pulled out my two favorite weathering friends out.  First I slathered on a very liberal wash of india Ink/Alcohol mix to the newly painted areas.  Then applied a good coat of dullcote to seal in the progress thus far.  Then I attacked by highlighting areas by dry-brushing with white paint.  After doing these important steps it began to come alive.  

The roof still needs to be darkened, but that will happen after I finish the windows (I don't like windows anymore).  I still have a hefty amount of work on the bottom two floors, then an interior for the bottom floor.  The back is still unfinished but that will be left for last. 

I have enjoyed the comments this far and please don't hesitate to ask about anything, I am more than happy to answer.  After this is done I will do a few smaller structures, then you know I must out do this.

Thanks,
Chris


Saturday, December 20, 2008

Photo of the Day

Just a quick one today.  This is the Dominion not long after its construction.  The sign on top, I might add to my model when it is complete.  I don't know when it was taken down, but I believe it was during the thirties.  The era Im modeling is the fifties, however I kinda like it up there.

Tomorrow at about 6 p.m (MTN time) I will update on the progress of the Dominion Bldg.  It is starting to look somewhat like a building.

Chris

Friday, December 19, 2008

Photo of the Day

Just pretend that this is a photo taken on my layout, cause I know I do, sigh!..... some day.  This is another Jack Delano photograph, he took this shot of I believe an NYC SW8 switching at the Water Street freight terminal, in Chicago 1943.

Wednesday, December 17, 2008

Photo of the Day

I want to introduce you to one of my favorite railroad photographers, Jack Delano.  Every time I look at at this photo I just stare in amazement, and am just in a daze.  Not all of his photos are this great but he has some really good ones, mostly of midwestern subjects.  My first Photo of the Day was also one of his and I can guarantee that I will shear more.
The photograph was taken inside of the Chicago & North Western roundhouse in December 1942 Chicago. 

Chris 

Tuesday, December 16, 2008

Photo of the Day/Potential Kitbash


I actually found this photo today.  It is a Swift & Company milk and butter fat receiving depot and creamery, located in Caldwell, Idaho (1940).  I was looking at it and I thought "that looks like the Brach's Candy factory that Cornerstone makes!" and sure enough they are very similar.
It will take at least two kits to make it work, possibly three.  First I would chop the top floor, then extend the upper floor about what looks like two window panes.  Depending how close to the prototype you want to be, all the superficial concrete columns, windows and brick needs to be cut out and replaced on the outside sections.
The loading dock and awning will need to be scratch built but thats not a very big deal.  The cornice on top of the fourth floor will need to be scratch built as well.  The difficult part will be to match the brick on the kit.  Then the raised brass or gold Swift & Co. sign could be a issue but something out there will work.
This isn't something I could do for awhile but I just thought it would look good on layout if anybody else wants to give it a go.  The Brach's Candy factory is currently discontinued, but Walthers will be doing a limited production in March.

Chris
   

Monday, December 15, 2008

Photo of the Day


Sorry I missed a few days of this but I am sure that will happen from time to time.  
Okay to business.
If you look very carefully you will see a row of buildings just behind the tree that may look familiar.  They are the same ones that I posted about earlier, the one with 3 1/2 floors.  This is about two decades before the other photo, and about a decade before this, an El ran through here.  The locale of the scene is called Peter Minuit Plaza, in lower Manhattan. 
A photo like this one is a very valuable thing to have if you are working towards a specific era and feel.  I love the signs on these buildings and plan to implement as much of them as possible into current or future projects.  The other thing that if it wasn't here you couldn't date the photo mentally in your head as easy, is the cars and busses.  Using period vehicles is a key element that will help date your layout, especially  for the non railroader.  They may not know that a SD70ACe wasn't around in the 50's but they will know that a 1996 Ford Taurus were nowhere to be found.
Also on a unrelated note, I have gobs of time this weekend and will be blitzing the Dominion Building, I need it done by the first of March so I can enter it for NMRA AP judging contest.  So stay tuned for Sunday night as I will give a update then.

Chris

Sunday, December 14, 2008

UCW Operating Session

Yesterday I had to drive about two hours in snowy weather (not fun) to get to my destination, the Utah Colorado Western Railroad.  A few months ago a new acquaintance of mine (Kelly Newton) that I will be doing modules with, invited me to attend a op session.  I had never attended one of these before and I was a little intimidated.  But I was invited back so I must have done okay, because from what I here that most don't get invited back.
The layout is freelance western bridge route that runs between Denver and Salt Lake City.  The layout resides in Lee Nicholas' basement, but was built by many of his friends.  It has been on the cover of Model Railroader and featured in many other magazines as well.   Something that I have learned by doing the op sessions with these guys is that I don't know anything.  The guys that attend are some of the most knowledgeable about anything railroad related that I have ever met, and it is a humbling experience to be around them.  I just have had more fun listening to them talk as I have playing trains up there.
I have a few photos that I took last night but for many many more go towww.ucwrr.com.
Enjoy,
Chris
I believe a crew house at Jiggs.

Overview of Hamilton.

Looking back at Hamilton on the left.

Looking down to Cobre.

Coal mine at Cobre.

Thursday, December 11, 2008

Behind the Scenes

I always like to see other modelers work space, some have some very nice setups that I envy and others use kitchen tables.  I have always found it beneficial to have a dedicated work area, but I do realize that for some it is not a possibility.  So today I give you a glimpse into the behind the scenes of my structures and how I try to keep things organized. 
This is the overview of my work space.  My work bench is technically a small drafting table, but it works fine for my current needs.  I am a sucker for music and I must have something playing while I work, it helps me to focus on the project at hand.  That is why I have my cheap turntable and head phones near by. Also this is about as messy as I allow it to get, I work better in a clean and organized environment.

A little closer view of the work bench.  The black and green thing in the foreground is my favorite tool, if you don't have a Chopper, get one, and when you do, get the Chopper II.  I had many issues with accuracy with the Chopper I, but it was better than nothing.  I could not survive with out it.

For all of my strip and sheet styrene, brass, paper and other stuff I store in legal file folders inside of a plastic storage tote, letter file folders are too short for 12" long strips.  I still don't have a good solution for my basswood, most of the stock is about 24" long.

For my windows and doors I love these little storage dividers.  They are fairly cheep and do a great job.  I try to have a good stock of parts on hand cause I cant run out and pick these up, I have to order them, so when I need them I have them.

This is another tote that I have my detail parts in, I need much much more of this stuff cause you can never have too much detail.  
So thats all, in a bit I will post a few pictures of some of my dream work benches.

Wednesday, December 10, 2008

Photo of the Day

Today we are back in Chicago, its the day after Christmas in 1967 and the CB&Q Empire Builder pulls out from Union Station.  The station is out of view because of the massive post office (the large white building on the left) is right in font of it.  Two other buildings that are of interest are the huge Pennsylvania Railroad warehouse on the right.  Then the tallest building on the left is the Chicago Board of Trade, at the foot of this building is the LaSalle Street Station that is served by the Rock Island and New York Central Railroads.

Tuesday, December 9, 2008

Photo of the Day

Again I got this photo from the LoC years ago so I don't have much data.  I do know it is New York and it is near the Fulton Fish Market.  I found this one when I was researching the area for a possible part of my fictional city of Hudson.  

Monday, December 8, 2008

Photo of the Day

This image I found on the Library of Congress site, if you've never been I highly recommend it.  I know this scene is in New York City, during the late 60's or 70's, but beyond that I just don't know.  The thing that is fascinating is the building second from the left,  why do the floors progressively get shorter as you ascend.  The windows  on top I would say is just a second set of windows for the 3rd floor, but why is there is a fire escape on floor 3 1/2 ???  

Chloe's Cafe


Over the weekend I pumped out a new little structure that I have named after my daughter Chloe.  This little guy was a kit (this was the first kit i've made in about five years) made by Willmodels that you can only get off of ebay.  I was introduced to these from a post on the very good  N Scale Modeling Blog.  As of yet there are only three kits available and I chose his Millie's Cafe kit that will go on my mining town module that I will start on soon.
I basically stuck to the instructions on the assemblage, but I did the painting and signs how I wanted so it would be somewhat unique.  Kits are great but I wish more people would have some fun with them and stray from the picture on the box and make it their own.  While I am up on my soap box I want to say how much I dislike the "built ups" or factory finished structures that are becoming more popular today.  For the most part they look good, but you kill the creativity and uniqueness that is great about this hobby (okay off soap box).
  If you are wondering why the front steps are missing it is because when this get planted on the layout the front door will be level with the side walk and the ground will slope away from the front.  most of the signs I found online with exception to the yellow Chloe's Cafe sign, I made that one.
The Coke sign was forged from .010" sheet styrene, .015" brass wire and two copies of a Coke logo from the inter-web.  The little light is .015" brass wire and a Titchy Train Group shade.  I built the billboard from HO scale 3"x3" strip wood and .025" spacing siding from Northeastern Scale Lumber, and a add that I found ages ago.  
I fiddled about with the paint on the brick to get a fairly realistic look.  It turned out okay but next time around it should turn out better.  I weathered it with a wash of india ink / alcohol mix, then I added some dirt and rust effects and then toned down the whole thing with a diluted white paint mixture.  Between each coat I sealed it with Dullcote, if you don't you will be in a world of blah.

Chris


Sunday, December 7, 2008

Photo of the Day


Im going to try to get a photo up almost every day of something.  I will try to keep them related to either of my two modeling locales or at least railroad or modeling related.  What I want to do is share many of the pictures that I use for reference or inspiration.   
To start of we will start of with one of my favorites.  I don't know the year it was taken but it feels like the 40's.  But what you are seeing is the Illinois Central yards at the foot of the amazing Chicago skyline.  This photo is what my ultimate goal or vision looks like, I want to capture this feel, not necessarily the exact scene but the feel.

Tuesday, December 2, 2008

Dominion Bldg. Post Card from 1916


I found this post card of the original building from 1916.  I know there was a face lift on the building and some parts of the roof were changed,  but I don't know if the colors were changed in the past as well.  If those colors were right, I personally think a disservice was done by changing it to the monotony  of the current version.
I had thought about changing my version to the colors in the post card, but I think that it will call to much attention to it.  Believe it or not I actually want this building to blend in with the other buildings.  I want it to be part of a scene, or make the scene, not some loud drunk causing the others to be uncomfortable and feel out of place.  
Let me know your thoughts of the colors, should I change it to the post card or stay with my own color pallet? 
Chris

Post card

How it stands today

I Do Windows


I spent most of last weekend framing windows, and have survived to tell the tale.  To begin with this little beast has 166 windows, I finished 88 of them, plus the 21 that I had done earlier on the 11th floor.  Of the 88, 33 were ones that I redid from months ago because they were no good (I may redo the other 21 windows as well).  The windows that are not done will be finished in stages, the ones in the top two floors are next.
Now each of the 88 windows had a grand total of 12 individual parts of strip styrene, that is 1056 parts for those windows.  Most of the remaining windows will not require as many pieces as the others . . . . . . whew!   
If I add the detail that I did under the windows that I did two weeks ago to the list of parts we get the tiny number of 1475 parts.  I am sick and tired of windows for a bit, what I need to do is make molds and cast my windows . . . oh well there's always next time.
Next up after I finish the 16 windows on the top two floors is work on the bottom two floors.   I need to add allot of detail and finish the mezzanine area then, gasp! . . . more windows!?

All the parts for the 88 windows precut.

I stuck in a sheet of black paper so the windows would show up.

Saturday, November 29, 2008

Bingham Canyon


Sometime in the future, if I have the space and I want to do a mountain theme, this is prototype railroad that I would love to model.  I wish any of this was still around, but all is gone so more copper could be mined.  From these photos the scenes are begging to be modeled, and as far as I know nobody has yet.